Identity Document Module Block Configuration
This module is tailored for configuring the ID document step of your user flow. By going through the following step, you should be able to configure your ID document step, note that if your flow requires multiple documents captured, you need to add multiple steps and need to do the below configuration on each.
Configure Step Level Checks
In each ID document block, you have the option to activate or deactivate the following checks.
- Expired Document Check: Enabled by default This check prevents the acceptance of expired documents, ensuring all verifications are current and valid.
- Document Authenticity Check: Enabled by default, this check enables the system to detect potential fraud or tampering automatically.
- Face Match with Selfie Check: Activated by default, this feature facilitates the comparison of the face on the document with the selfie. The default threshold for face matching is set at 80%, but you can adjust this level to increase or decrease the strictness of the match. A threshold of 80% is recommended based on extensive testing, which has proven effective in reducing False Match Rates (FMR) and False Non-Match Rates (FNMR).
- Accepted Documents: Define the types of identity documents and their issuing countries that are acceptable. Remember, the document's issuing country might not match the applicant's nationality, and you can accommodate various identity documents from different countries within the same step.
- Allowed Nationalities: Specify which nationalities can be accepted for the verification process to tailor your user base as required.
- Excluded Nationalities: Determine any nationalities that should be automatically rejected, maintaining control over your user onboarding.
- Document Issue Date Threshold: Set a maximum age for accepted documents to ensure the documentation is up-to-date.
Step Level configurations
The following configuration you can apply them on the ID document block to give you more control to configure this ID document step in your flow.
- Mandatory: Enabled by default, this setting determines if the step is compulsory in your process. Should a user fail to complete this mandatory step, the journey will be marked as 'refer'. Conversely, if the step is set as optional (not mandatory), the journey will not be flagged even if the user skips this step.
- Allow File Upload: Grant users the ability to upload images of their documents from their devices instead of capturing them by camera from a physical identity document.
Noteit's recommended to have this disabled as allowing file upload increases the probability of end-user fraud, So best to make sure that you have evaluated the risk impact on this first.
- Document belongs to: Use this setting to specify whether the document is for verifying an applicant or a vehicle. If 'applicant' is chosen, an automatic face match between the ID photo and the selfie will be conducted, provided the face match check is enabled above. However, if 'vehicle' or another category is selected, the face match process will not be executed.
- Double-Sided Document Behavior: Determine whether to capture both the front and back sides of the document or just the front.
User Interface Content Customization:
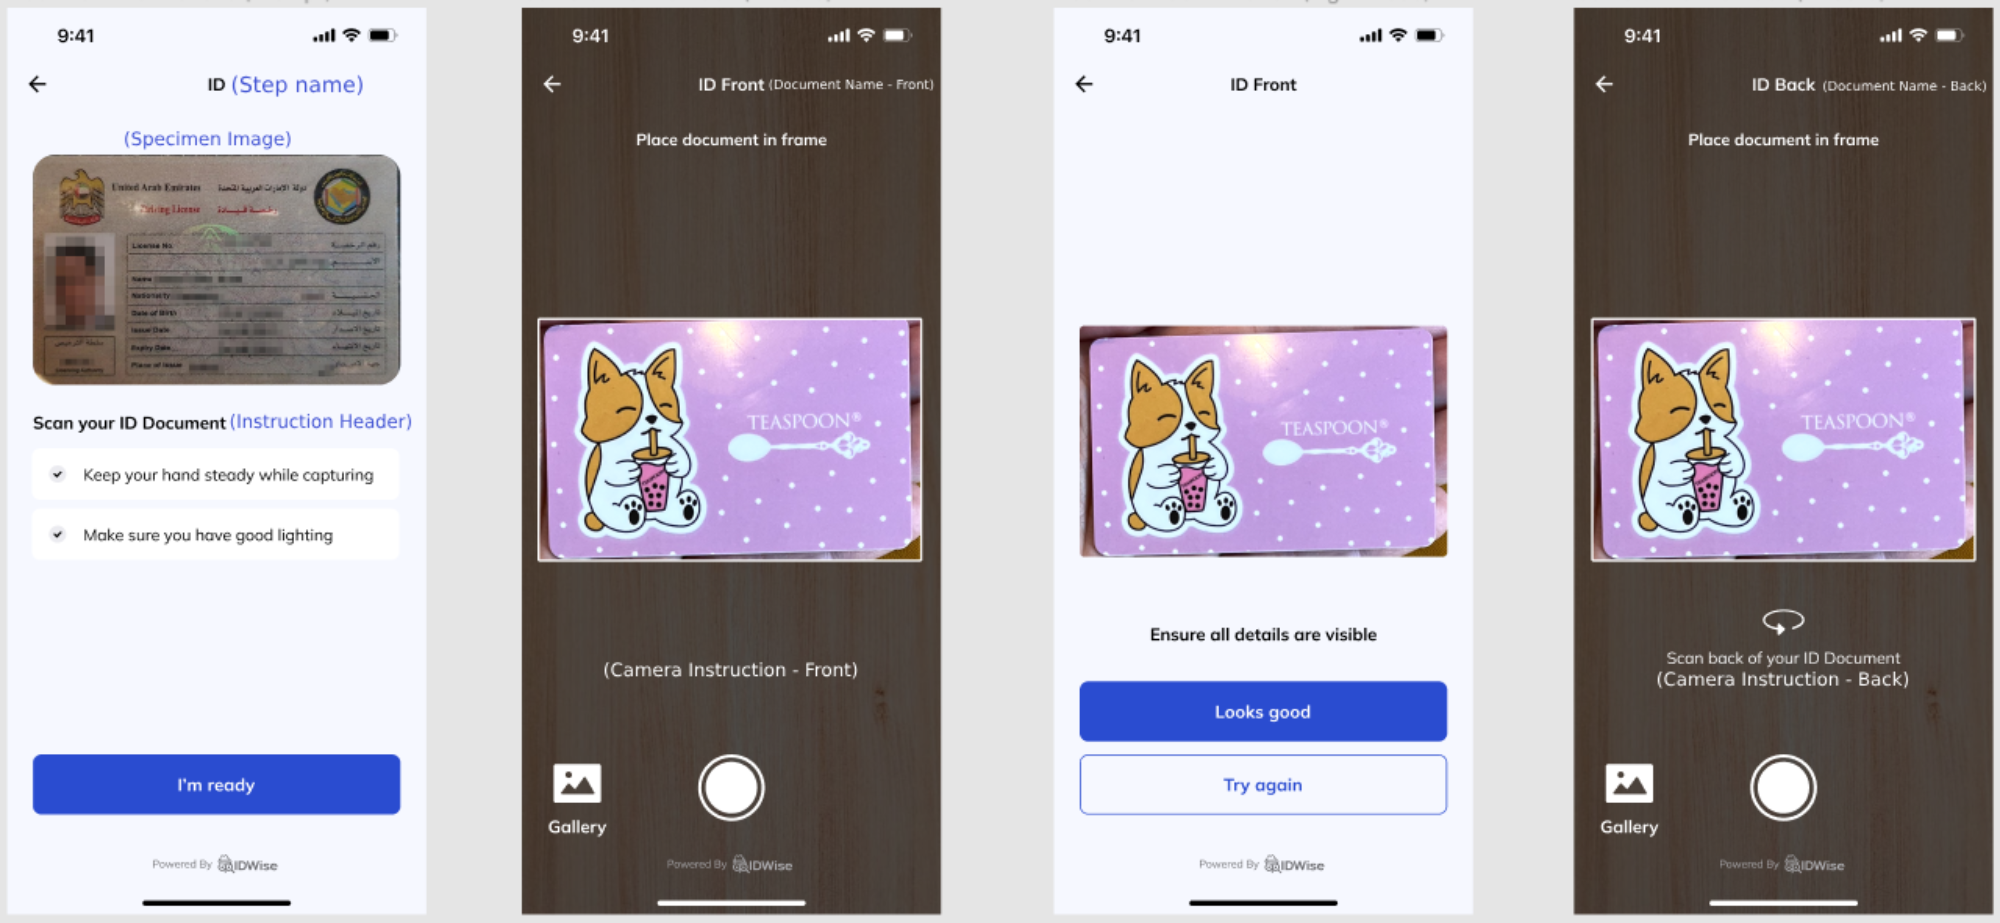
Each step of the onboarding process includes three primary screens:
- Instruction Screen: This screen provides necessary guidance to the end user before beginning the step. It includes:
- Step Name: Such as "ID Document" or "Passport." It is recommended to keep this name to a maximum of two words.
- Specimen Image: A visual representation showing what the user needs to scan during this step.
- Instruction Header: A title for the instruction, e.g., "Scan Your ID Document."
- Instruction Bullets: Detailed instructions specific to this step.
- Camera Screen: This screen is designed for document/selfie capture. The main customizable text here is the Camera Instruction - Front If the step involves capturing both the front and back of a document, you can also customize Camera Instruction - Back
- Confirmation Screen: all the text in this screen can be customised from the Theme Designer portal.
The image below displays all screens in the same order from left to right: Instruction Screen, Camera Screen for the front, Confirmation Screen, and Camera Screen for the back.

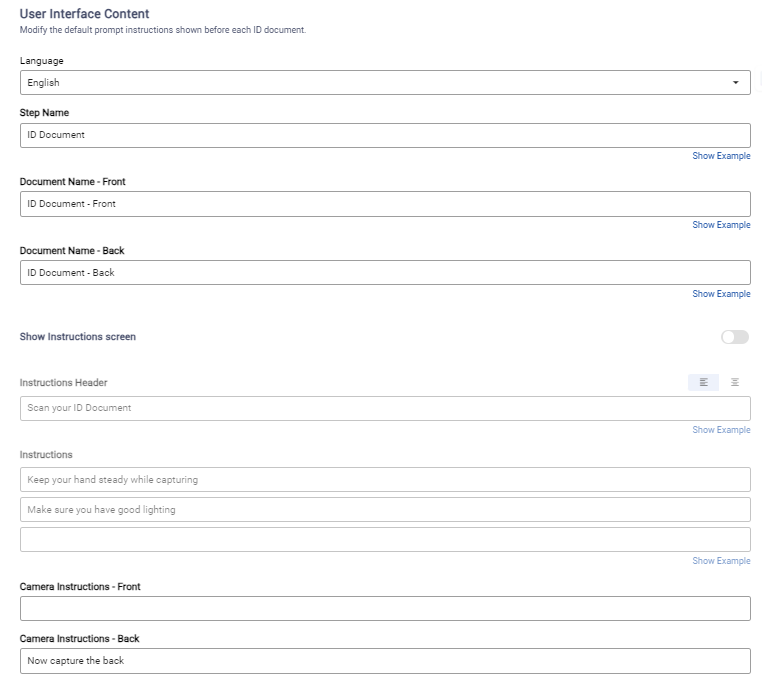
Configure UI Content for a Specific Step
The image below illustrates the UI content configuration for each step in the Flow Builder. Here, you can set up all the text for the screens mentioned above. If you wish to include multiple languages in your UI, you can select the desired language for configuration in this section.

Updated 5 months ago
