
Using Dynamic SDK
Use the IDWise Dynamic SDK to control ID verification journey steps from your mobile app.
Introduction
The IDWise Dynamic SDK is designed for advanced integrations, giving hosting apps full control over ID verification steps. Your app manages the transition between each step (e.g., document or selfie step), allowing for greater flexibility but requiring more integration effort. For most cases, the Standard SDK is recommended. See the full comparison between the Standard and Dynamic SDKs here.
Requirements and Installation
Please refer to this link for requirements and steps to install the IDWise SDK per platform
IDWise Dynamic SDK Integration Prompt
Copy this prompt into your AI coding assistant (Cursor, Claude Code, Copilot, etc.) to integrate the IDWise Dynamic SDK into your project. Replace [PLATFORM] with Android, iOS, Flutter, React Native, Cordova, or Capacitor.
View Integration Prompt
You are an expert mobile SDK integration engineer.

I am integrating the IDWise Dynamic SDK into the project this prompt is pasted in.
Detect the platform (Android / iOS / Flutter / React Native / Cordova / Capacitor) from the project. If signals are mixed or ambiguous, ask before continuing.

## Source-of-truth docs (use these exact pages — don't substitute)
- Dynamic SDK runtime: https://docs.idwise.com/docs/dynamic-sdk-usage
- Install / build setup index: https://docs.idwise.com/docs/sdk-integration-1 → follow the platform-specific child page
- Latest version: pull from the platform's release-notes page on docs.idwise.com. Use the latest entry — do not leave a `<VERSION>` placeholder.
- Dynamic SDK callbacks: https://docs.idwise.com/v3.0/docs/idwise-sdk-callbacks
- Step result model: https://docs.idwise.com/docs/step-result-model
- Journey summary: https://docs.idwise.com/docs/getting-journey-status
- SDK error codes: https://docs.idwise.com/docs/sdk-error-codes

## Hard rules

1. **Implement every abstract member** of the journey-callbacks and step-callbacks interfaces, even ones the docs don't list. A compile error of the form "does not implement abstract member X" means X exists and must be implemented — do not work around it.
2. **Do not invent methods.** Use only methods shown in the Dynamic SDK docs or exposed by the installed SDK artifact. If something I asked for isn't exposed by the resolved artifact, say so explicitly and stop — do not fabricate a signature.
3. **Do not start a step early.** Only call `startStep`, `startStepFromFileUpload`, or `skipStep` after `onJourneyStarted` or `onJourneyResumed` has fired.
4. **Not done until it builds.** Run the platform build, fix until zero compile errors, and paste the final command + last ~10 lines of output as proof.

## Ask before guessing

If any of the following are unclear from the project, ask me — do not assume:
- Which screen / button / action should trigger `startJourney` and which UI control should trigger each `startStep`.
- Whether to wire `resumeJourney`, `startStepFromFileUpload`, or `skipStep`, or only the core `startJourney` + `startStep` flow.
- Which step IDs from Flow Builder map to which app actions. If step IDs are not available, keep `<STEP-ID>` placeholders and show exactly where to replace them.
- Where SDK initialization should live (app entry point vs. lazy-init at first journey).
- Whether to persist `journeyId` for resume across app restarts, or keep it in memory only.
- Whether optional steps should be skipped individually with `skipStep` or skipped by ending the journey with `finishJourney`.
- Whether the host app already has a runtime-permissions pattern I should match before I add my own.
- Any applicant-details fields I should populate beyond the SDK-required minimum.

Group related questions into one round.

## What to deliver

### A. Build setup
- Add IDWise repositories / package sources.
- Dependency at the actual latest version from the platform release-notes page.
- Required build flags from the install page (e.g. on Android: `multiDexEnabled`, `dataBinding`, min/target SDK).
- Camera permission entries:
  - Android: `<uses-permission android:name="android.permission.CAMERA"/>` + `<uses-feature android:name="android.hardware.camera"/>`
  - iOS: `NSCameraUsageDescription` (plus microphone/photo if applicable)
  - Flutter / React Native / Cordova / Capacitor: add the required native permissions in platform folders.
- Register the Application / AppDelegate / plugin entry-point if initialization lives there.

### B. Runtime integration
1. SDK initialization with `<YOUR_CLIENT_KEY>`, theme, onSuccess, and onError.
2. Start a new journey with `<FLOW_ID>`, `<REFERENCE_NUMBER>`, locale, applicant details, journey callbacks, and step callbacks.
3. Resume an unfinished journey if requested, using `<FLOW_ID>`, stored `journeyId`, locale, journey callbacks, and step callbacks.
4. Full implementation of every journey callback exposed by the installed SDK, including started / resumed / completed / cancelled / blocked / error / any others the interface declares. Log the full payload for each callback.
5. Full implementation of every step callback exposed by the installed SDK, including `onStepCaptured`, `onStepResult`, `onStepCancelled`, and error states. Log the full payload for each callback.
6. Start each step with `startStep` only after `onJourneyStarted` or `onJourneyResumed` fires.
7. If file upload is requested, wire `startStepFromFileUpload` with image data that satisfies the image-data requirements page.
8. If optional steps are skipped, call `skipStep` for individual optional steps or `finishJourney` when all remaining optional steps should be skipped.
9. After journey completion, call `getJourneySummary` and determine the outcome:
   - passed when `isCompleted` is true and `journeyResult.interimRuleAssessment` is `Passed`
   - failed when `journeyResult.interimRuleAssessment` is `Failed`
10. Call `unloadSDK` when the journey is complete and explain that another journey requires re-initializing the SDK.

### C. Placeholders to keep verbatim
- `<YOUR_CLIENT_KEY>` — in init only
- `<FLOW_ID>` — as a constant
- `<REFERENCE_NUMBER>` — as a constant
- `<JOURNEY_ID>` — fallback when no stored id exists
- `<STEP-ID>` — for each Flow Builder step until real step IDs are provided

### D. Execution & report
Apply the changes directly to the project — edit the actual files, do not just print snippets. At minimum:
- App entry point (Application / AppDelegate / plugin init) — created or modified.
- The screen / action that starts the journey — wired up.
- The screen / action that starts each Dynamic SDK step — wired up.
- Manifest / Info.plist — permission and entry-point registrations added.
- Dependency / build-config files — repositories, dependency line, required flags added.

After applying changes, report:
- Short platform checklist of what was done.
- List of files created / modified, with a one-line note on each.
- One sentence per journey callback and step callback explaining where it connects in the app lifecycle.
- Final build command and last ~10 lines of its output, as proof of a green build.
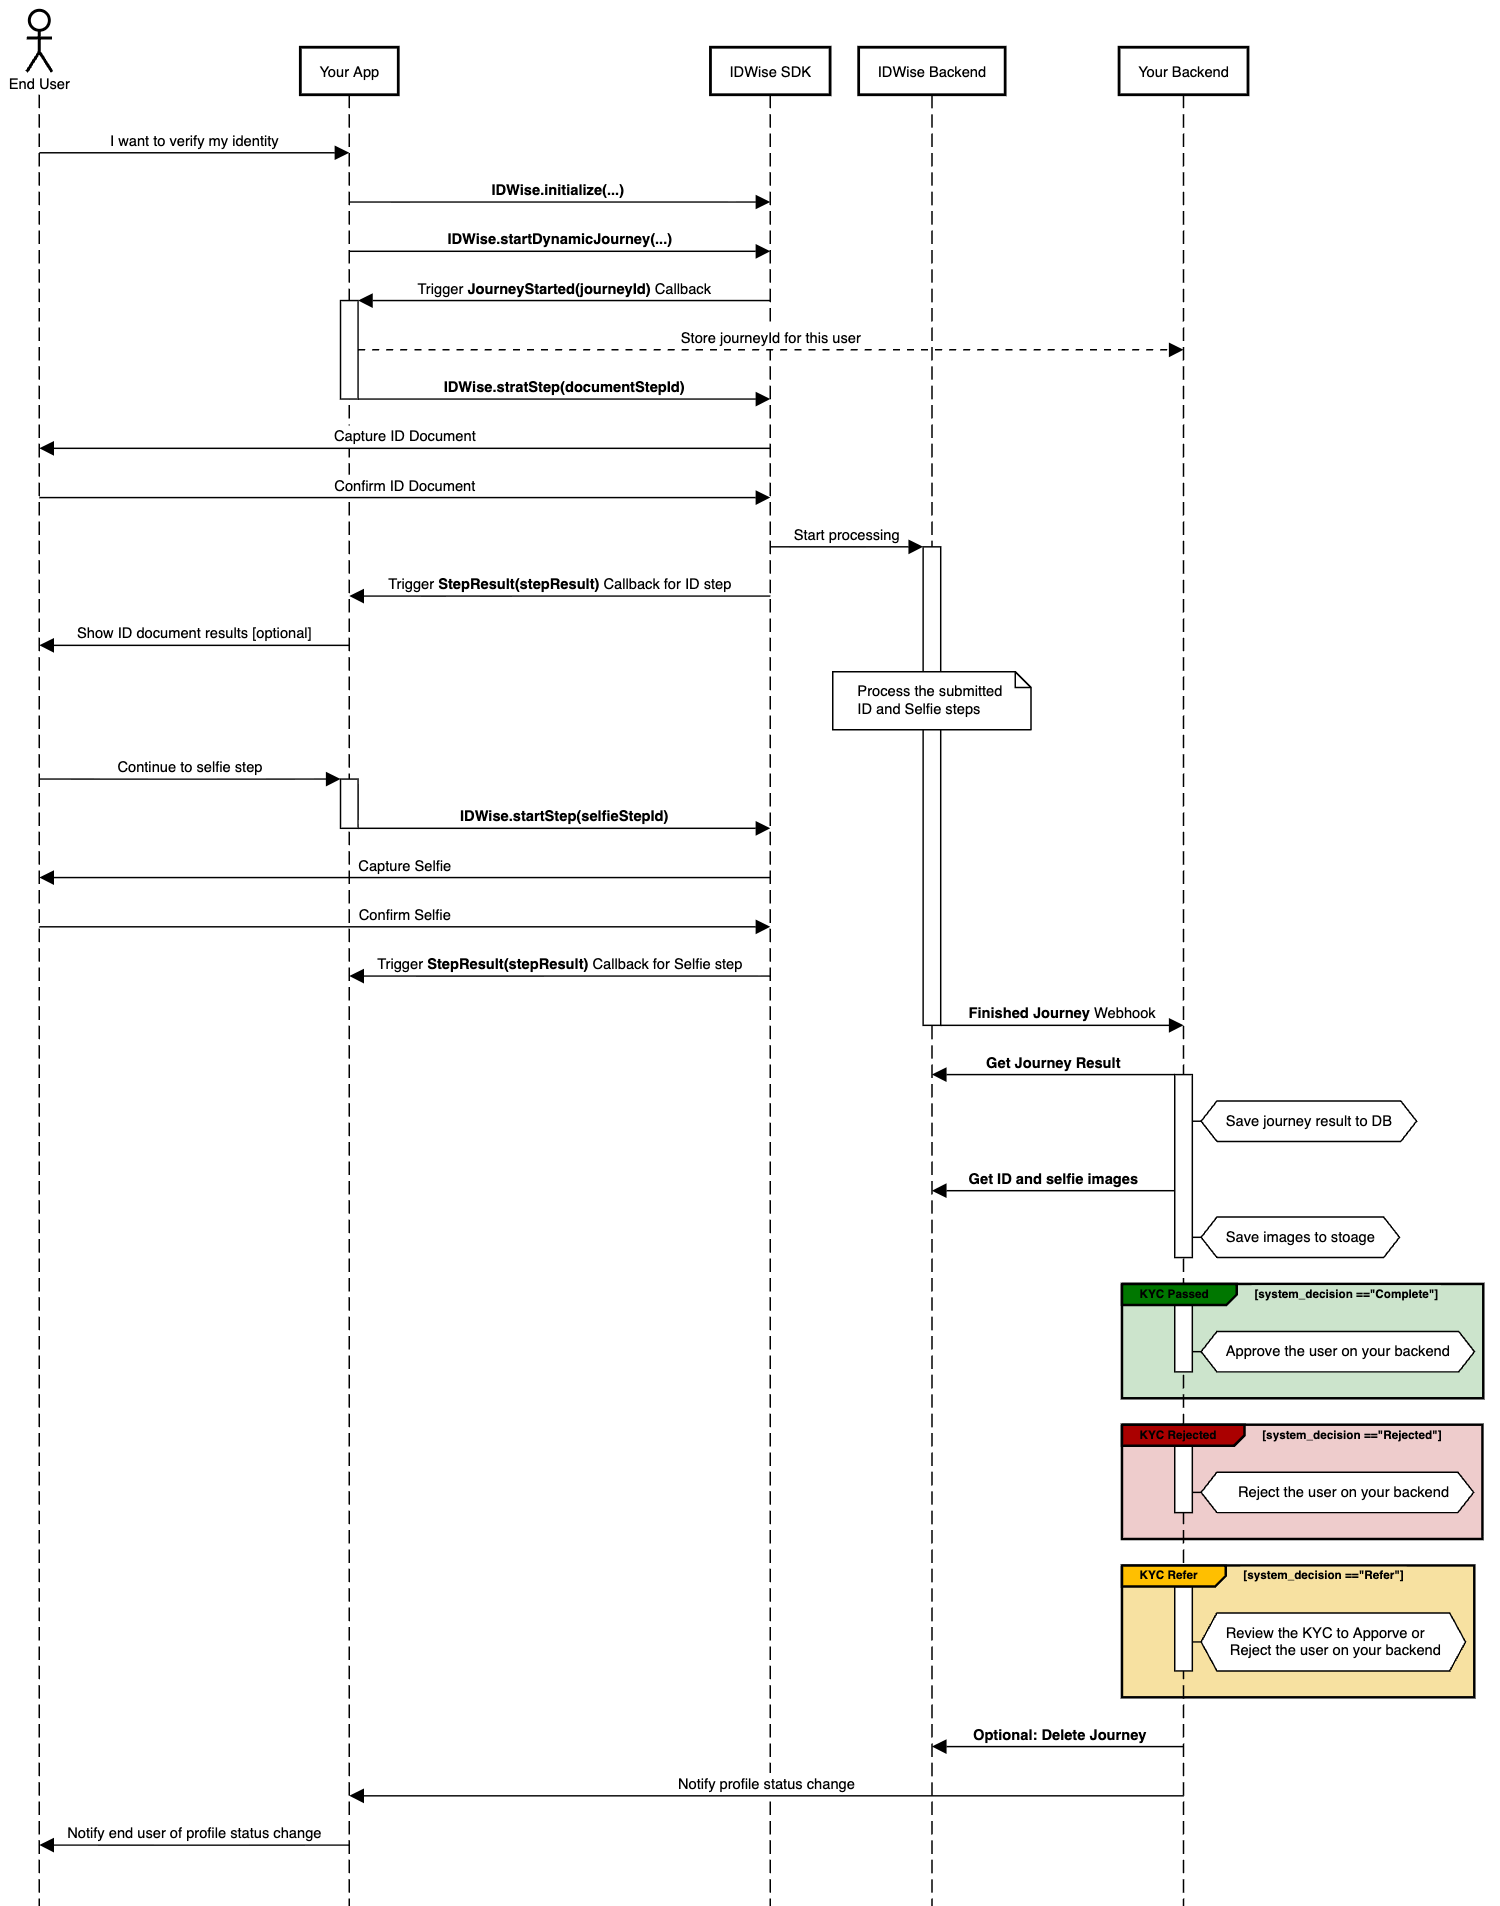
Full Integration Sequence Diagram Using Dynamic SDK
Here is a sequence diagram illustrating the steps to integrate with IDWise Dynamic SDK.
Dynamic SDK Usage
Below are the steps to integrate with the IDWise Dynamic SDK.
1. Import the SDK into your project
You can import the SDK into your code file as follows:
import com.idwise.sdk.IDWiseDynamic
import com.idwise.sdk.data.models.*
import com.idwise.sdk.IDWiseJourneyCallbacks
import com.idwise.sdk.IDWiseStepCallbacks
import IDWiseSDK
// If using the NFC SDK, import this instead
import IDWiseNFCimport ‘package:idwise_flutter_sdk/idwise.dart’;import {IDWise} from 'idwise-react-native-sdk/src/IDWise';
import {IDWiseSDKTheme} from 'idwise-react-native-sdk/src/IDWiseConstants';There is no need to Import SDK in Capacitor2. Initialize the SDK
To use the Dynamic SDK, you have to initialize it by calling the following method:
val clientKey = "<YOUR_CLIENT_KEY>"
val theme = IDWiseTheme.SYSTEM_DEFAULT //[LIGHT, DARK, SYSTEM_DEFAULT]

IDWiseDynamic.initialize(
  clientKey = clientKey,
  theme = theme,
  onSuccess = {
    Log.d("IDWiseSDKCallback", "initialize Success")
	},
  onError = { error: IDWiseError? ->
     Log.d("IDWiseSDKCallback", "initialize error: ${error?.message}")
   }
)
let clientKey = "<YOUR_CLIENT_KEY>"
let theme = IDWiseTheme.systemDefault //[.light, .dark, .systemDefault]
IDWiseDynamic.initialize(clientKey: IDWiseDemoConstants.clientKey,theme: .systemDefault, onSuccess: {
print("SDK Initialized Successfully")
}, onError: { err in
if let error = err {
// handle error, show some alert or any other logic
}
})String clientKey = "<YOUR_CLIENT_KEY>"
IDWiseTheme theme = IDWiseTheme.LIGHT //[DARK, LIGHT, SYSTEM_DEFAULT]
IDWiseDynamic.initialize(clientKey,theme, onSuccess: () {
print("SDK Initialized successfully");
},
onError: (error) {
print("onError: $error");
});const clientKey = "<YOUR_CLIENT_KEY>";
const theme = IDWiseTheme.SYSTEM_DEFAULT; //[LIGHT, DARK, SYSTEM_DEFAULT]
IDWiseDynamic.initialize(clientKey, theme, {
onSuccess() {
console.log('Event onInitalizeSuccess');
},
onError(error) {
console.log(' onInitializeError: ', error);
}
});function error(error) {
//error callback for errors occured in initialize
console.log(
"onError :",
error.code,
error.message
);
}
var clientKey = "CLINT_KEYE"; //provided by IDWise
var theme = "SYSTEM_DEFAULT"; //available values: LIGHT, DARK, SYSTEM_DEFAULT
IDWiseDynamic.initialize(clientKey, theme, error);The initialize method accepts two parameters and an onError callback which will be triggered if an error occurred during initialisation:
clientKey: A key used to authenticate your app with the IDWise backend. You can generate this key by following the instructions here.theme: Defines the appearance (Dark/Light Mode) for the IDWise SDK screens. If set tosystemDefault, the SDK will automatically follow the device's system mode.
3. Start a New Journey
After initializing the SDK, you can begin an ID verification journey. To initiate the process, use the startJourney method as shown below.
val flowId = "<FLOW_ID>"
val referenceNo = "<REFERENCE_NUMBER>"
val locale = "en"

//Optional
val applicantDetails = hashMapOf<String, String>()
applicantDetails[ApplicantDetailsKeys.FULL_NAME] = "John Doe"
applicantDetails[ApplicantDetailsKeys.BIRTH_DATE] = "2000-02-13"
applicantDetails[ApplicantDetailsKeys.SEX] = "male"
applicantDetails[ApplicantDetailsKeys.ADDRESS] = "Apartment Number, Building Name, Building Number, Street Name, Suburb, City, District, Postal Code, State, Country"
applicantDetails[ApplicantDetailsKeys.NATIONALITY_CODE] = "GBR"


IDWiseDynamic.startJourney(
  application = application,
  flowId = flowId,
  referenceNo = referenceNo,
  locale = locale,
  applicantDetails = applicantDetails, //Optional
  journeyCallbacks = journeyCallbacks,
  stepCallbacks = stepCallbacks
)
let flowId = "<FLOW_ID>"
let referenceNo = "<REFERENCE_NUMBER>"
let locale = "en"
// Applicant details is optional
let applicantDetails: [String:String] = [
ApplicantDetailsKeys.FULL_NAME: "John Doe",
ApplicantDetailsKeys.BIRTH_DATE: "1995-05-06",
ApplicantDetailsKeys.SEX: "male",
ApplicantDetailsKeys.ADDRESS = "Apartment Number, Building Name, Building Number, Street Name, Suburb, City, District, Postal Code, State, Country",
ApplicantDetailsKeys.NATIONALITY_CODE = "GBR"
]
IDWiseDynamic.startJourney(flowId: flowId,
referenceNumber: referenceNo,
locale: locale,
applicantDetails: applicantDetails, // can be passed as nil If you don't want to pass any applicant details
journeyCallbacks: self,
stepCallbacks: self)String flowId = "<FLOW_ID>"
String referenceNo = "<REFERENCE_NUMBER>";
String locale = "en";
//Optional
Map<String, String> applicantDetails = HashMap();
applicantDetails["full_name"] = "John Doe";
applicantDetails["birth_date"] = "2000-02-13";
applicantDetails["sex"] = "male";
applicantDetails["address"] = "Apartment Number, Building Name, Building Number, Street Name, Suburb, City, District, Postal Code, State, Country";
applicantDetails["nationality_code"] = "GBR";
IDWiseDynamic.startJourney(
flowId: flowId,
referenceNo: referenceNo,
locale: locale,
applicantDetails: applicantDetails,//Optional: can pass null if not required
journeyCallbacks: _journeyCallbacks,
stepCallbacks: _stepCallbacks);
var flowId = "<FLOW_ID>"
var referenceNo = "<REFERENCE_NUMBER>"
var locale = "en"

//Optional
const applicantDetails = {};
applicantDetails[ApplicantDetailsKeys.FULL_NAME] = 'John Doe';
applicantDetails[ApplicantDetailsKeys.BIRTH_DATE] = "2000-02-13"
applicantDetails[ApplicantDetailsKeys.SEX] = 'male';
applicantDetails[ApplicantDetailsKeys.ADDRESS] = 'Apartment Number, Building Name, Building Number, Street Name, Suburb, City, District, Postal Code, State, Country';
applicantDetails[ApplicantDetailsKeys.NATIONALITY_CODE] = 'GBR';


IDWiseDynamic.startJourney(
  flowId,
  referenceNo,
  locale,
  applicantDetails, //Optional. Can pass Null if not needed
  journeyCallbacks,
  stepCallbacks
);
var flowId = "<FLOW_ID>"
var referenceNo = "<REFERENCE_NUMBER>"
var locale = "en"

//Optional
const applicantDetails = {};
applicantDetails[ApplicantDetailsKeys.FULL_NAME] = 'John Doe';
applicantDetails[ApplicantDetailsKeys.BIRTH_DATE] = "2000-02-13"
applicantDetails[ApplicantDetailsKeys.SEX] = 'male';
applicantDetails[ApplicantDetailsKeys.ADDRESS] = 'Apartment Number, Building Name, Building Number, Street Name, Suburb, City, District, Postal Code, State, Country';
applicantDetails[ApplicantDetailsKeys.NATIONALITY_CODE] = 'GBR';


IDWiseDynamic.startJourney(
  flowId,
  referenceNo,
  locale,
  applicantDetails, //Optional. Can pass Null if not needed
  journeyCallbacks
);
This method takes the following parameters:
flowId: This is a unique identifier that identifies your journey flow. You can get access to all your flows from here .referenceNo: (Optional) This is provided by your application and represents how you identify the user in your system (e.g., a UserID from your database or a phone number, etc.).locale(Optional): This parameter specifies the ISO code for the desired language of the SDK's user interface screens. If not provided, English will be used as the default language. For a list of available languages, adding additional languages, please contact IDWise Support or you can add additional languages via IDWise Theme Designer.applicantDetails: (Optional) This parameter allows you to pass user information collected in your system to the IDWise platform. This data will be cross-matched with the information extracted by IDWise from the user's documents.journeyCallbacks: This parameter allows you to define event handlers at the journey level. The list of journey-level events can be found here.stepCallbacks: This parameter lets you define event handlers at the step level. The details of step-level events are available here.
4. Start Step
To start a specific step you need just to call startStep as follows:
IDWiseDynamic.startStep(
  context=context,
  stepId="STEP-ID"
)
IDWiseDynamic.startStep(stepId: String) IDWiseDynamic.startStep("STEP-ID");IDWiseDynamic.startStep("STEP-ID");IDWiseDynamic.startStep("STEP-ID");
ImportantMake sure you call
startSteponce theonJourneyStartedoronJourneyResumedcallback is triggered.
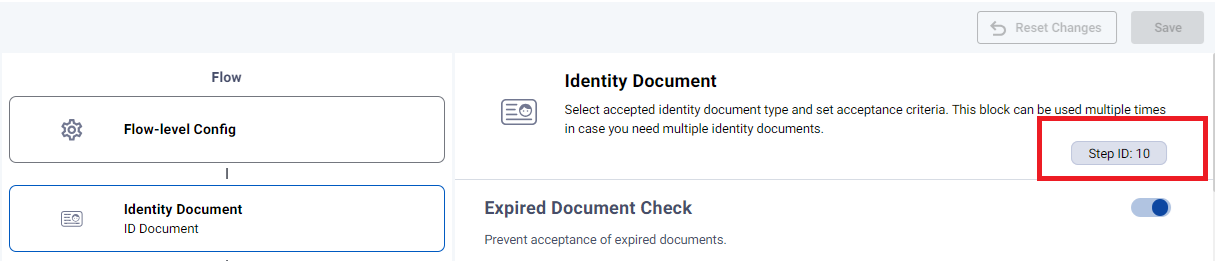
stepId: The ID of the step you want to start. You can retrieve the step ID from the Flow Builder, where it will be highlighted in the corresponding step block of your flow.
The step capture UI will be shown to the user. once the user captures the image(s) and confirms the following callbacks will be triggered in this order:
onStepCaptured: This callback is triggered that contains the captured images in the callback payload.onStepResult: This callback is triggered once the processing of the step is finished. The results you will receive in this callback can be found here.
If the user cancels the step instead of completing it then onStepCancelled callback will be triggered.
4.1 Start Step Using File Upload - Optional
In certain cases, if your application requires performing a step based on file uploads instead of directing the user to the Camera UI, you can utilize the startStepFromFileUpload method. This allows the step to be initiated using file uploads. Below are the details for implementing this functionality:
IDWiseDynamic.startStepFromFileUpload(stepId: String,image: Data,backImage: Data?) IDWiseDynamic.startStepFromFileUpload(context: Context, stepId: String, image: ByteArray, backImage: ByteArray?) stepId: The ID of the step you want to start.image: The Data or byteArray form of the Image that you want to submit as front Image or selfie.backImage(Optional) : The Data or byteArray form of the Image that you want to submit as back Image of a particular step.
Once the submitted Image/file is processed, the following callback will be triggered:
onStepResult: This callback is triggered once the processing of the step is finished. The results you will receive in this callback can be found here.
When using startStepFromFileUpload ensure that the byteArray/Data adheres to the requirements specified here
5. Complete Journey
Finally, after handling all the required steps, if there are some optional steps remaining, which are no longer required, you have to call finishJourney method to finish the journey. Otherwise, if all the steps are concluded, they journey will be completed automatically and you'll get onJourneyCompleted(...) callback.
IDWiseDynamic.finishJourney()IDWiseDynamic.finishJourney()IDWiseDynamic.finishJourney()IDWiseDynamic.finishJourney()IDWiseDynamic.finishJourney()Note: Calling finishJourney when there are still incomplete mandatory steps, will cause the journey to refer, and any unsubmitted optional steps will be automatically skipped.
6. Getting the Journey Status
Once all user steps are completed and you want to check the journey status, you can do so by calling the IDWiseDynamic.getJourneySummary(...) method. This method returns a journey summary object. To determine if the journey status (Passed, or Failed), rely on the following conditions:
- The journey is considered successful if
isCompletedisTrueandjourneyResult.interimRuleAssessmentisPassed. - The journey is considered failed if
journeyResult.interimRuleAssessmentisFailed.
Refer here to comprehensive guide for get journey summary
7. Unloading the SDK
Unload the SDK once the journey is complete to free up resources or to start or resume another journey if needed. You can unload the SDK by calling the unloadSDK method as shown below.
IDWiseDynamic.unloadSDK()IDWiseDynamic.unloadSDK()IDWiseDynamic.unloadSDK()IDWiseDynamic.unloadSDK()IDWiseDynamic.unloadSDK()
InfoTo start another journey after unload the SDK you need to re-initialize the SDK again by calling
initalizemethod
Skip Optional Steps
In some scenarios, your flow may include optional steps that you want to scan based on certain conditions. If you decide to skip a specific step, you can simply call the skipStep method as shown below.
IDWiseDynamic.skipStep(stepId="STEP-ID-TO-SKIP")IDWiseDynamic.skipStep(stepId: String)IDWiseDynamic.skipStep("STEP-ID-TO-SKIP");IDWiseDynamic.skipStep("STEP-ID-TO-SKIP")IDWiseDynamic.skipStep("STEP-ID-TO-SKIP")stepId : ID of the step you want to skip.
InfoOnce the
onJourneyStartedoronJourneyResumedcallback is triggered, you can allow the user to start a step by callingstartStepmethod.
Sample Project
Updated 4 months ago