Identity Document Module Block Configuration
Configure Identity Document module checks, step behavior, and user-facing screen content in Flow Builder.
Configure the Identity Document module block to define which documents users can submit, which validation checks run, and what content appears during document capture.
If your flow requires users to submit multiple documents, add one Identity Document step for each document and configure each step separately.
Enable or disable checks such as document expiry, authenticity, face match, accepted documents, and nationality rules.
Configure mandatory behavior, upload options, double-sided capture, data confirmation, and user-facing screen text.
Configure Step Level Checks
Use step-level checks to control how IDWise validates the document submitted in this block.
| Check | Default | Description |
|---|---|---|
| Expired Document Check | Enabled | Prevents users from submitting expired documents. |
| Document Authenticity Check | Enabled | Detects potential fraud, tampering, or authenticity issues automatically. |
| Face Match with Selfie Check | Enabled | Compares the face on the identity document with the user’s selfie. The default face match threshold is 80%. You can increase or decrease the threshold to adjust match strictness. |
| Accepted Documents | Configurable | Defines which document types and issuing countries are accepted. The document issuing country may differ from the applicant’s nationality, and the same step can accept documents from multiple countries. |
| Allowed Nationalities | Configurable | Defines which applicant nationalities are accepted during verification. |
| Excluded Nationalities | Configurable | Defines which applicant nationalities are automatically rejected. |
| Minimum Document Age Check | Configurable | Sets the maximum accepted age for documents to ensure submitted documentation is up to date. |
| Accepted Field Value Rule | Configurable | Validates extracted document field values against a predefined list of accepted values. A mismatch causes the document check to fail. |
| Cross Match With Applicant Details | Configurable | Confirms that the personal details provided when starting the journey match the details extracted from the proof of identity document. |
Each rule has an action on failure: Refer or Reject. If the rule fails, the journey is either referred for review or rejected, depending on the action you configure.
Step Level Configurations
Apply step-level configurations to control how users complete this Identity Document step in your flow.
| Setting | Default | Description |
|---|---|---|
| Mandatory | Enabled | Requires the user to complete this step. If a mandatory step is not completed, the journey is marked as Refer. If the step is optional, the user can skip it without causing the journey to be flagged. |
| Allow File Upload | Configurable | Allows users to upload document images from their device instead of capturing a physical identity document with the camera. |
| Document Belongs To | Configurable | Specifies whether the document verifies an applicant, a vehicle, or another category. If you select Applicant, IDWise can run face match between the ID photo and selfie when the face match check is enabled. If you select Vehicle or another category, face match is not executed. |
| Double-Sided Document Behavior | Configurable | Defines whether users capture only the front side of the document or both the front and back sides. |
| Data Confirmation Screen | Configurable | Lets end users review, validate, and correct data extracted from the document when extraction is affected by image quality, capture quality, or other limitations. |
Keep Allow File Upload disabled unless you have evaluated the fraud risk. Allowing uploads can increase the probability of end-user fraud because users can submit existing images instead of capturing a physical document in real time.
Data Confirmation Screen Options
When the data confirmation screen is enabled, configure how users can review and correct extracted document fields.
| Option | Description |
|---|---|
| Editable Fields | Allows users to correct supported fields that are missing or inaccurately extracted. |
| Custom Labels | Lets you customize field labels to match your application terminology. For example, “Birthplace” can be displayed as “Place of Birth.” |
| Editing Threshold | Defines how much editing is allowed. Supported thresholds are 10%, 20%, 30%, 40%, 50%, and 100%. |
User Interface Content Customization
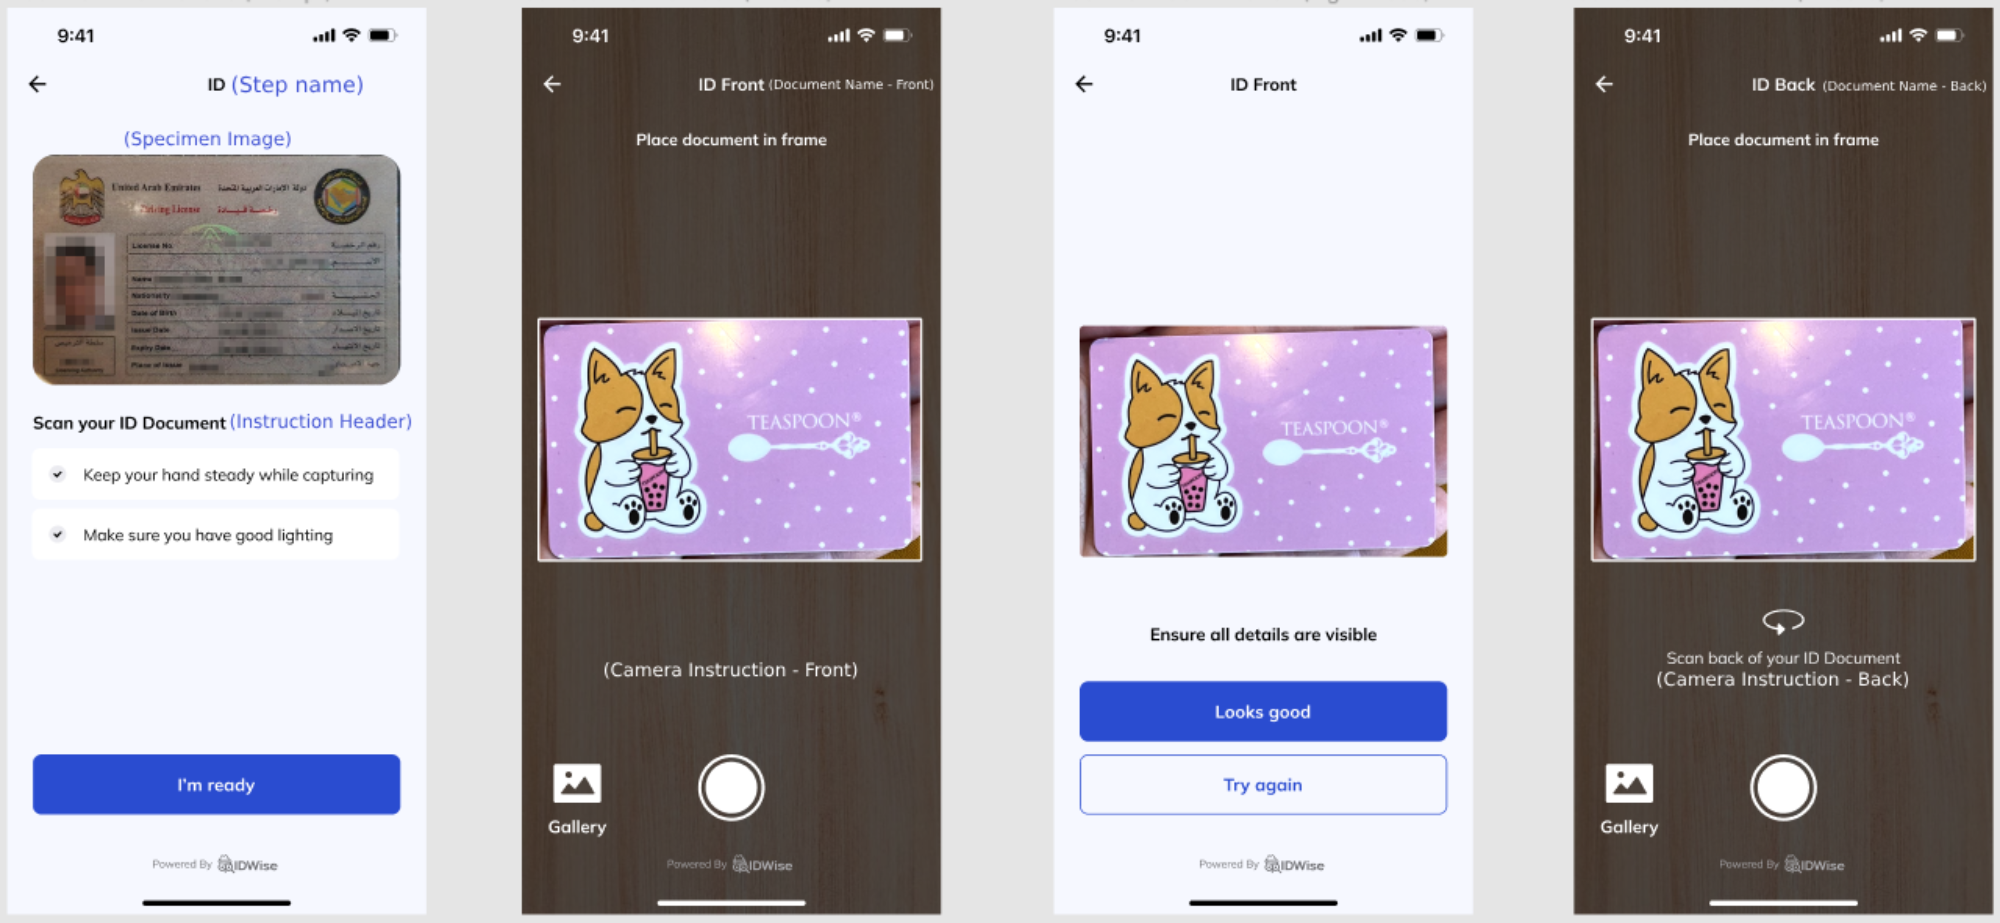
Each step of the onboarding process includes three primary screens:
Shows guidance before the user starts the step, including the step name, specimen image, instruction header, and instruction bullets.
Shows capture guidance while the user scans the document. You can customize the front-side instruction and, for double-sided documents, the back-side instruction.
Shows the user a confirmation experience after capture. Customize this screen from the Theme Designer portal.
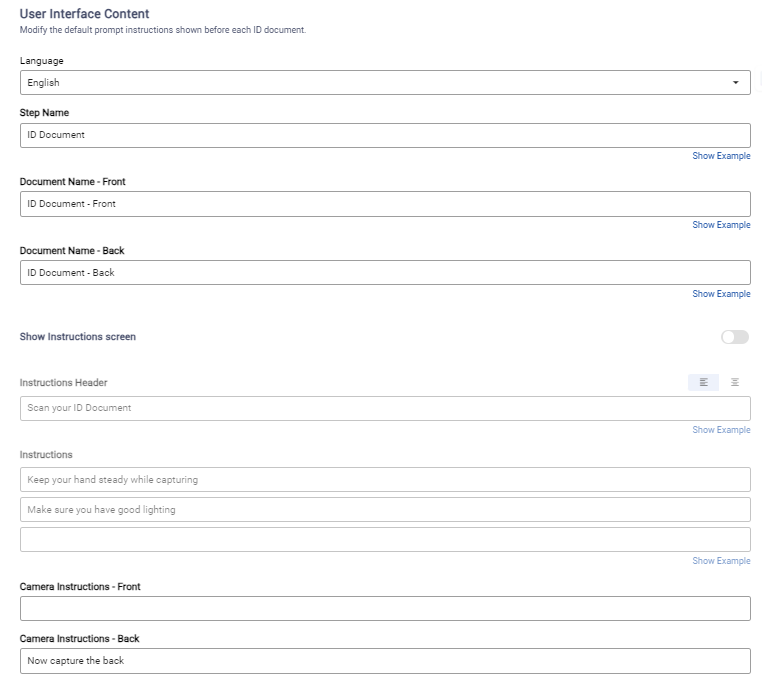
Instruction Screen Content
Configure the following content for the instruction screen:
| Field | Description |
|---|---|
| Step Name | The name shown for the step, such as “ID Document” or “Passport.” Keep this name to a maximum of two words. |
| Specimen Image | A visual example of what the user needs to scan. |
| Instruction Header | The instruction title, such as “Scan Your ID Document.” |
| Instruction Bullets | Step-specific guidance shown before capture begins. |
The image below displays all screens in the same order from left to right: Instruction Screen, Camera Screen for the front, Confirmation Screen, and Camera Screen for the back.
Configure UI Content for a Specific Step
Configure screen text for each step in Flow Builder. To support multiple languages, select the language you want to configure and enter the translated content for that language.
Updated about 1 month ago